The iLMS LDAP connector is an optional component for the iLMS. It is used to synchronize user accounts with any standard LDAP compliant user account system, such as Microsoft Active Directory. This fully automates the process of adding, editing, inactivating, and deleting user accounts, as well as moving users to new departments in the iLMS.
How It Works
Each organization can have one or more connections to one or more directory services. The connection can be to the entire directory service, synchronizing all user accounts, or at the level of an organizational unit (OU) so that only users within a particular OU are synchronized. Synchronization is one way, meaning edits within the iLMS do not filter back to your master user account database, and occurs on a user defined schedule, typically running once per night.
Connections to the directory service are made through a iLMS LDAP Connector, a windows application that resides on the same network as the directory service. Using our secure API and a Windows service (installed by the installer), users are pushed to the iLMSdatabase for synchronization.
Pre-requisites for using iLMS LDAP Connector
- Windows operating system with .Net Framework v4.8 and above.
- iLMS API must be enabled in the LMS (Settings Tab - iLMS API)
- api.inspiredlms.com may need to be white-listed to ensure communication
- To use the new LDAP connector the old version must be uninstalled first.
- The new connector must then be downloaded and installed. Connection settings for your organization are saved, so once you install the new connector and put in API information your connection settings will repopulate on their own.
- The older version needed .Net Framework 4.6.2 or newer in order to operate, but the new installer requires v4.8 and above.
The newer version of .Net Framework can be downloaded here: https://dotnet.microsoft.com/download/dotnet-framework/net48
Important Facts about LDAP Connector
- LDAP connector is a one-way synchronization. It fetches users data from AD or Directory servers and adds/updates them in iLMS.
- It cannot fetch users password from AD or Directory servers.
- Multiple connections either pointing to multiple directory servers or to same directory server but different Organization Units/Groups/Distribution Lists, as long as the connection is installed on one machine.
- During the setup installation, the connector creates a Windows Schedule task to facilitate automatic sync of users as specified.
Preparation - Steps to download the application from iLMS
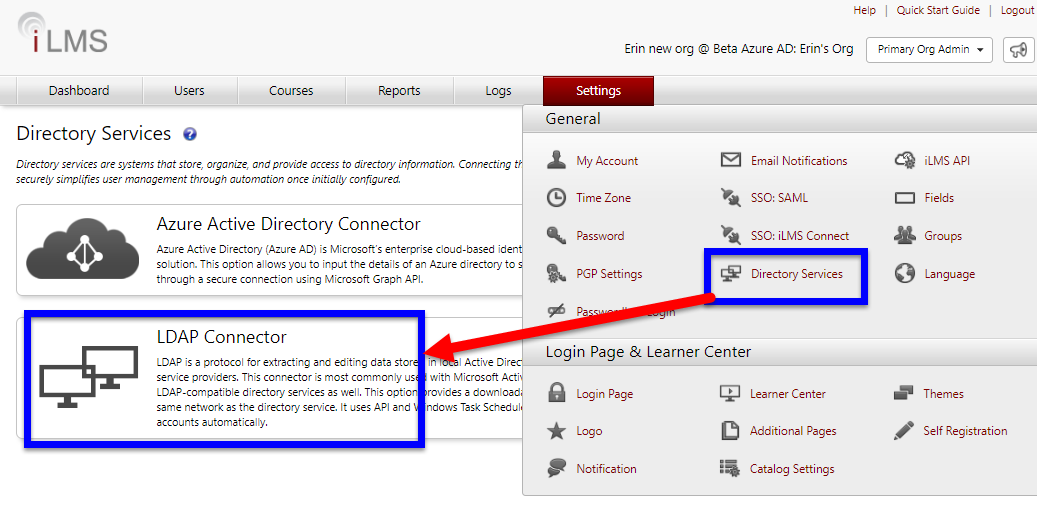
To Download the LDAP Connector, Navigate to the settings tab in iLMS.
Select "Directory Services" from the dropdown.
On the Directory Services page select "LDAP Connector"
Download the tool by clicking on the "Download LDAP Connector Tool" button on the resulting page.
This will download a zip file named LDAP_Connector_Setup.zip.
Move this zip file to a system that is part of the domain and has access to the LDAP directory.
Steps to install the iLMS LDAP connector
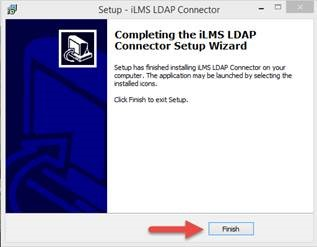
Extract the zip file that was downloaded and you will see a file named setup.exe
Right click on this file and select Run as administrator to execute the connector setup. The installer could take several minutes to complete.

When complete you will see the screen shown below indicating the installer has completed.
Click Finish.
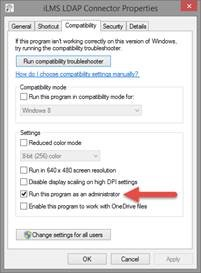
- Right-click on the iLMS LDAP Connector icon that was created on the desktop and select Properties.
- Click on the Compatibility tab.
- Under Privilege Level, make sure that the check box "Run this program as an administrator" is checked.
- Click OK to save this setting.
Configuring the iLMS LDAP connector
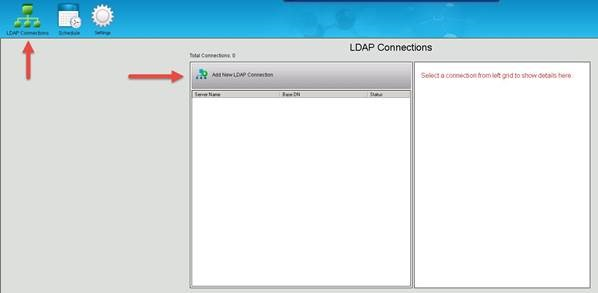
Open the iLMS LDAP connector program using the shortcut that was placed on the Windows Desktop.
You will be presented with a setup screen that will ask for API information for your iLMS organization.
This information can be found in the iLMS under Settings -> iLMS API.
Populate the fields and click on Save.
Once complete, click the LDAP Connections icon in the top right portion of the screen, then Add New LDAP Connection from the resulting Window.
Connection Settings
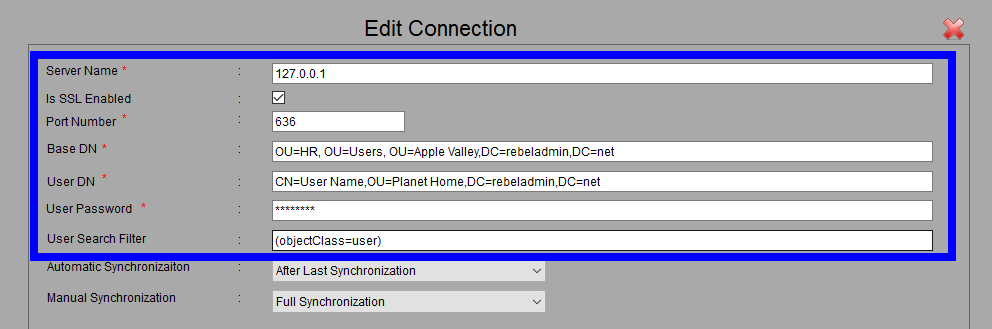
You will need to populate the following details for the connector to access your AD server and locate user accounts:
- Server Name
Hostname of Server is Highly Encouraged, but IP will work as well - Is SSL Enabled
If you have the ability to do LDAP over SSL we HIGHLY recommend using this more secure option for the connection. - Base DN
This the full DN that specifies the location in which all desired users are located in AD - User DN
This is the full DN for the account the connector will use to access the AD server. We recommend using a service account for this. - Password
This is the corresponding password for the service account specified in the User DN field. - User Search Filter
- This filter allows for you to pare down which users are imported into iLMS.
- This works much like the advanced custom search feature in AD, so it is a good idea to test any filter in AD first BEFORE running your first sync with it in the iLMS LDAP connector.
- Each Search filter will be unique to your organizations Active Directory structure and training goals in iLMS.
- We do recommend at the very least filtering for the user object class and excluding disabled user accounts.
That filter would look something like this:
(&(objectClass=user)(!(userAccountControl:1.2.840.113556.1.4.803:=2)))
For further guidance on LDAP filter syntax, there are many good online resources including many from articles from Microsoft like the one found here:
Microsoft | Search Filter Syntax
Our team will gladly review filters for syntax errors and can make suggestions, but cannot build the filter for your organization.
We do not have the insight into your unique AD environment to determine the best filter to fit your needs.
Once these settings have been populated, you can then use the green check to ensure the connection to Active Directory is working successfully.
This does not sync users, it only tests the connection to the AD server

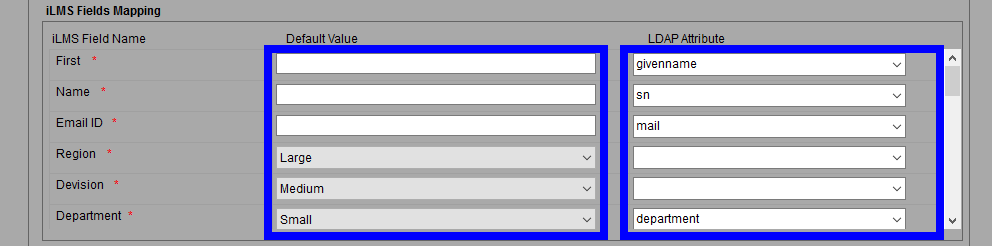
iLMS Fields Mapping
In this section, you will map the existing fields in iLMS to their corresponding AD attributes.
For the most accuracy, we recommend locating a sample user in AD and viewing the Attribute Editor for that user to ensure attribute names are typed exactly as they appear in AD.
iLMS field names marked with an asterisk * are required to be populated for every user.
Please note that you are free to use default attributes listed left-column or you may manually enter in the AD attribute that best fits the specified iLMS field.
The default value will populate in the users profile in the event the attribute from AD is left blank. At a minimum, It is recommended to map First Name, Last Name, and Email Address or Employee ID to attributes from AD.
If you would like to add additional attributes from AD and you do not currently see a field in iLMS that corresponds to the value you would like to add, then you can adjust which fields are used in a users iLMS profile by logging into the iLMS Admin Portal.
This can be done by navigating to Settings Tab -> Fields, and adding and removing the desired fields. (iLMS Fields and Unique Identifier)
It will take a few moments for the connector to realize the changes in the editor.
There are special characters which are restricted for user in iLMS fields, such as % + ; “ < >, for a full list of which characters can not be used in specific fields, please see the table at the bottom of this article.
The LDAP Connector can only pull in plain-text values from fields.
We do not recommend mapping lookup fields in AD such as "Supervisor Name' and "Supervisor Email" the connector will pull in the full DN path for the supervisor's user record.
If data from a lookup field is needed we've seen customers successfully use Power Shell scripts to extract the desired values from the Lookup field and populate them as plain-text into a custom AD user attribute that can then be used by the LDAP connector.
Inspired is unable to provide assistance with Powershell scripting as this is outside the scope of our tools and services, so this extra step is up to the discretion and ability of the individual or organization performing the setup.
Once all the desired iLMS fields have been mapped to their AD attribute counterparts, you can Save your changes, close X the Edit Connection window, and move forward with performing a manual sync of your user data.

Also, you do have the option to enable registration emails here, but this setting in the connector may be overridden by the option specified under iLMS Global Email Notifications ( Settings Tab -> Email Notifications - >General category)
Email Notification Types, Enable Location, and Triggers
Testing User Synchronization
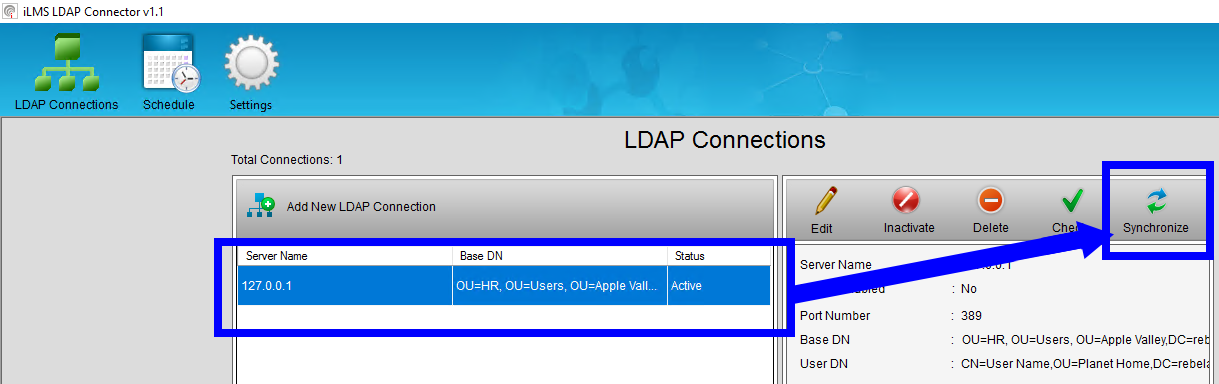
To test the connection, filters, and user provisioning you will need to perform a manual sync. This task can be performed from the main screen of the LDAP connector after closing out the connection editor.
- Simply Select the Connection you would like to Sync
- Then click the Synchronize option in the right pane, show below.
Once the sync begins the progress bar will appear, and upon completion, you will be able to view the full results of the synchronization in the log provided.
( Logs are stored here: C:\Program Files (x86)\Inspired eLearning Inc\LDAP_Connector\Logs )
Reviewing LDAP logs or Troubleshooting Sync Issues
There are two types of logs provided by the iLMS Connector, Detailed and Limited.
The type of log generated by the connector upon running a sync can be selected under Settings, located the main screen of the LDAP connector.
We generally recommend sticking with limited logging for regular day-to-day once your connector is set up as this saves storage space and only displays high-level details, but during initial setup and for troubleshooting purposes we recommend temporarily enabling detailed logs for the duration of troubleshooting.
Detailed logs are more useful in troubleshooting and checking a sync as it provides details about individual users that are synced.
For this example, we will be reviewing a detailed log to determine the results of the sync. Once the log has been opened for view, it is recommended to scroll to the bottom to view the Summary section which indicates the total number of users visible to the connector based on connection settings and the number of those users which were successfully synced to iLMS.
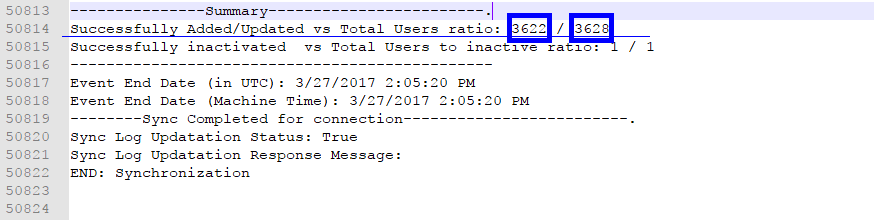
- If the 2nd number is 0 or less than expected, then there is likely an issue with the Base DN, User Search Filter, or permissions of the service account provided in the User DN. The connection does not see the users where specified.
- If only the 1st number is 0 or less than expected, then the issue is likely in the iLMS Attribute Mapping Section. The connection sees users, but they cannot sync.
- To identify which fields are the issue in iLMS Field Mapping, scroll up in the log above the summary section to view log entries for individual users included in the sync. Any accounts which failed to sync will have a reason listed next to "Result Response Message: ".
For Example:
"Result Response Message: Email ID is missing "
This would indicate that the email ID was either not populated in AD or that the attribute name in the mapping section did not match the actual attribute name used by AD.
- To identify which fields are the issue in iLMS Field Mapping, scroll up in the log above the summary section to view log entries for individual users included in the sync. Any accounts which failed to sync will have a reason listed next to "Result Response Message: ".
- The detailed log is useful when troubleshooting issues with the sync of individual users as well. Simply search for the user in the log and the error will provide details on why the user was not synced. If the user does not exist there may be an issue with Base DN or LDAP search filter which may be excluding the user.
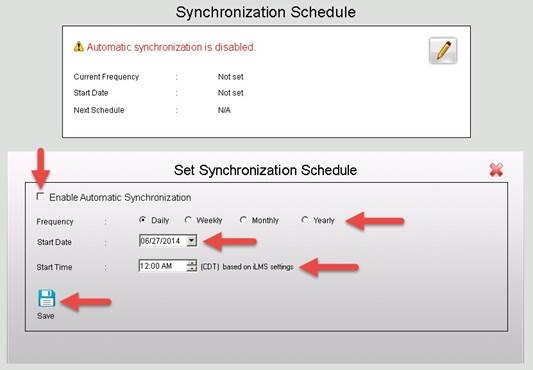
Scheduling Automatic Synchronization
After testing to ensure that users are populated correctly, you can use the scheduler to run the iLMS / LDAP synchronization tool on a regular cadence of your choosing.
Additional Information | Restricted Characters
ID & Field Name | Restricted Characters | LDAP Connector |
|---|---|---|
First Name | % + ; “ < > |
|
Middle Name | % + ; “ < > |
|
Last Name | % + ; “ < > |
|
Employee ID | % + ; “ < > |
|
Hire Date | All Date & Time format supported |
|
User Language | % + ; “ < > |
|
Job Title | % + ; “ < > |
|
Address1 | % + ; “ < > |
|
Address2 | % + ; “ < > |
|
City | % + ; “ < > |
|
Country | Allowed: |
|
State (US or Canada) | Allowed: |
|
State/Province/Region (Non US) | % + ; “ < > |
|
ZipCode | % + ; “ < > |
|
Email ID | Allowed Characters | `~!@#$&*()=}{|':./_ as first character is not allowed in LDAP Connector. First character should be alphanumeric for LDAP Connector |
Phone | % ;"<> |
|
Fax | % + ; “ < > |
|
Region | % + ; “ < > |
|
Division | % + ; “ < > |
|
Department | % + ; “ < > |
|
Company/Employer | % + ; “ < > |
|
Timezone | Allowed Format: |
|
Custom Field1 | % + ; “ < > |
|
Custom Field2 | % + ; “ < > |
|
Custom Field3 | % + ; “ < > |
|
Custom Field4 | % + ; “ < > |
|
Supervisor Name | % + ; “ < > |
|
Supervisor Email ID | Allowed Characters | `~!@#$&*()=}{|':./_ as first character is not allowed in LDAP Connector. First character should be alphanumeric for LDAP Connector |
