Email Campaign
Campaigns -> Start a New Campaign -> Email Campaign
This section outlines how to create and schedule email campaigns
This tool will allow you to send out one or multiple emails to selected users. Choose email templates from our library of system templates, your organization's custom templates, or a bit of both.
These emails can be sent to users at randomized times during a specified time span or all at once.
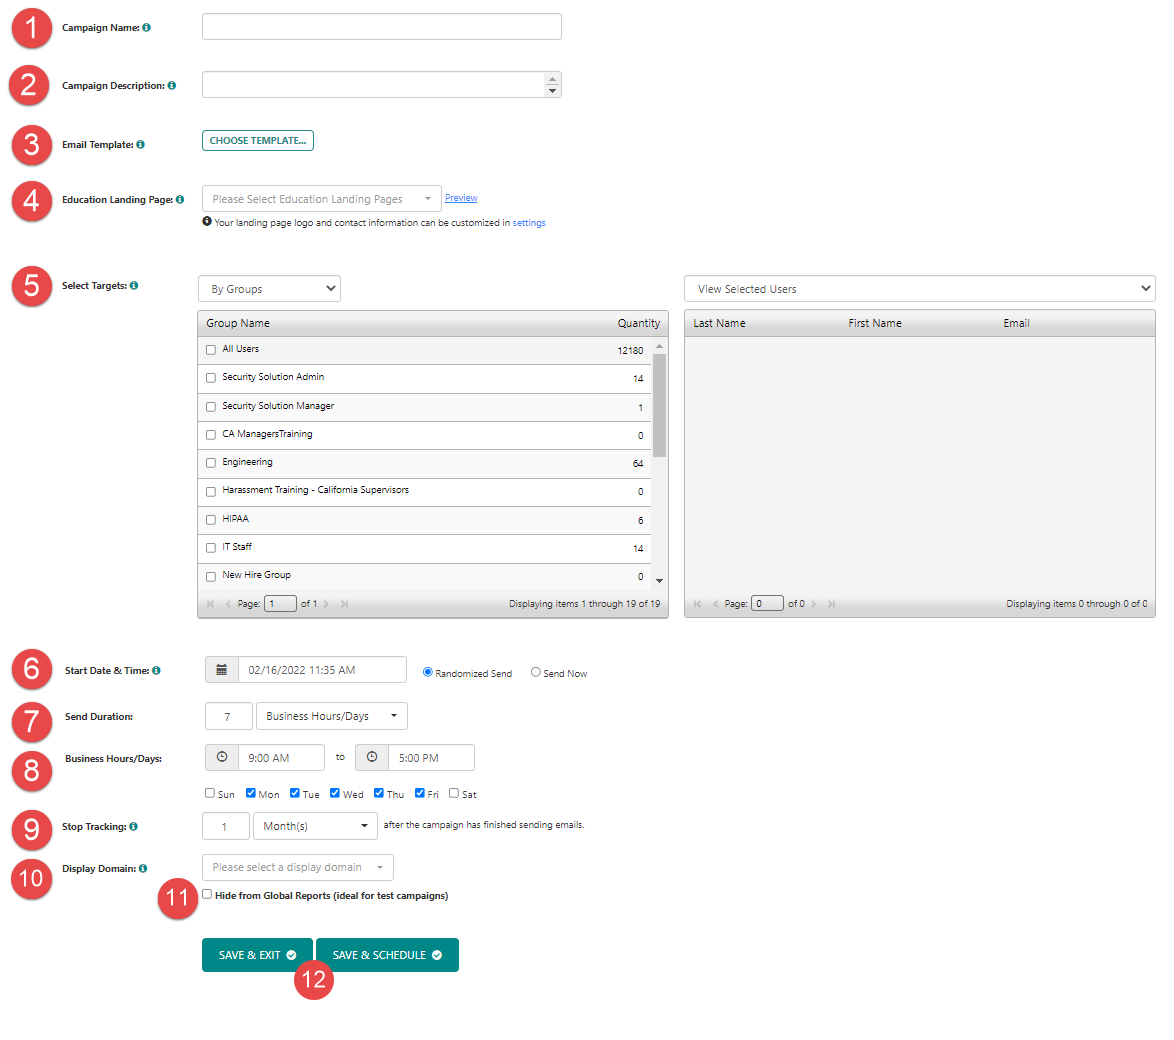
Campaign Options
This tool offers a variety of options for sending your campaign. See descriptions for each numbered item below the image.
(click to view enlarged image)
1) Campaign Name
This is a title for your campaign. This title will appear on the main Campaign page in the list of draft, scheduled, or completed campaigns.
2) Campaign Description
The Campaign description will allow you to add additional detail in regards to what your campaign is about.
3) Email Templates
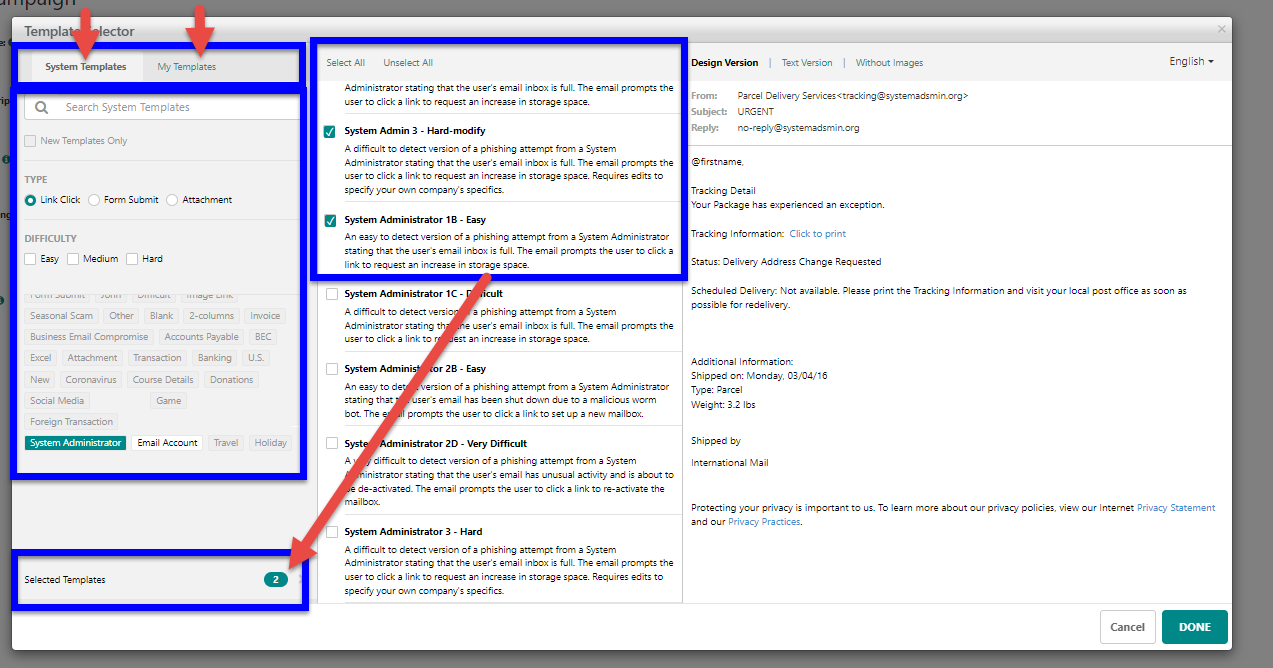
- Click the "choose template" button to bring up the template selector.
 (click to view enlarged image)
- Use the tabs in the upper-left switch between viewing a list of system templates or your custom templates.
- Search and filter options are available in the pane on the left to help you narrow down results to only templates that fit the desired criteria
- Clicking templates will allow you to preview the email that will be sent in the pane on the right.
The language dropdown (upper-right) allows you to view how the template will look in other languages. - To select templates to use in your campaign, place a check in the box next to the template's name.
- Click "Selected Templates" to view only templates you currently have selected for use in the campaign. These are the templates that will be sent to targeted users. Each user will get a random template from this selection.
- All templates used in a campaign must be the same type. Link click, Form submit, or Attachment.
- Custom email templates must be created prior to creating the email campaign. To create a customized email template, go to the main Templates tab and click on Email Templates.
More Detail on how to create Custom Email templates here:
Creating Custom Templates and Landing Pages
4) Education Landing Page
Select an Education Landing Page from the dropdown list. Your users will see this whenever they are “phished,” or fall victim to a phishing simulation.
Here, you can select the Education Landing Page that your users will see whenever they are susceptible to a Phishing simulation. The Education Landing Page is an on-the-click educational tool that lets users know to be wary of such emails in the future. With this immediate reinforcement, users will be able to recognize the tells of real phishing attempts.
More Detail on how to create Custom Landing Page templates here: Creating Custom Templates and Landing Pages
5) Select Targets
This section allows you to select the Targets or recipients of your randomized campaign. Targets can be selected by Hierarchy (region, division, dept), Groups, or Individual User. They can also be selected from a previous Campaigns target list or the Susceptible Users list which includes individuals who have been phished in previous campaigns.
6) Start Date and Time
Here you can schedule the date and time at which your campaign will start sending the randomized emails to the specified targets.
7) Send Duration
The duration is the number of days over which the campaign will take place. The optimal span is 7 days for more authentic results and ease of delivery to inbound mail servers by reducing the bulk of the send.
8) Business Days
In this section, you can specify the hours and days of the week which make up your organizations Business Hours. This will ensure that campaign emails are not sent outside of regular business hours to increase the probability of the recipient seeing the email.
For this reason, we recommend having at least 2 business days selected for a campaign with a 1 business hours/day duration, or ensuring your Start date/time is at least 24 hours apart from your intended end date/time.
For example:
- If today is Friday, October2nd.
- I select today's date as my campaign start date.
- My send duration is "1 business hours/days"
- I then check the box for only Friday as my business days.
- The campaign will start today and conclude the next applicable day, which is Friday a week from today.
9) Stop Tracking
This option will specify how long user actions in the Phishing simulation will be recorded for reporting after the campaign emails have been sent.
10 )Display Domain
When a learner hovers over a targeted link in the phishing email, the selected display domain will be shown instead of the actual destination.
11) Hide from Global Reports
This option should only be used in the event an administrator is running a test campaign. When enabled, this option will ensure that results from tests campaigns are not included in reporting, nor will the recipients be assigned any training upon failing the simulation.
12) Save Buttons
- Save & Exit – This action will save your input so that you can return to make any adjustments and launch the campaign at a later date. You will see the saved campaign in the Draft section of the Campaigns Home tab. It will be labeled as incomplete.
- Save & Schedule – This action will launch the campaign as you have designated. You will see the saved campaign in the Scheduled section of the Campaigns Home tab. Once the messages have all been sent, the campaign will move to the Completed section.
Note: Campaign Details will not appear until all emails for the campaign have been sent. After emails finish sending you will be able to see details for all users that received an email and whether as well as click/form/attachment data.
