Azure Active Directory (Azure AD) is Microsoft’s enterprise cloud-based identity and access management (IAM) solution. The Azure AD connector in iLMS allows you to input the details of an Azure directory to seamlessly synchronize your user accounts through a secure connection using Microsoft Graph API.
Requirements for Initial Setup:
- Admin access to Azure Active Directory
- A tenant in Azure containing users
- An application under the tenant
- A client secret for the application
- "User.Read.All" Microsoft Graph API permission for the application
- iLMS admin console access
Important Facts about Azure Active Directory Connector:
- This tool uses a one-way synchronization. It fetches user data from the Azure directory and adds/updates/inactivates users in iLMS
- It cannot fetch user passwords from Azure. We do have another tool that can be used for Single SignOn with Azure using SAML. More info here: Single Sign-On with Azure (Link to Microsoft Article)
- You can set up connections to multiple Azure directories. It is best if the users do not overlap between these directories. If multiple Azure user accounts exist with the same unique identifier used in iLMS, that could cause issues.
- The first sync with Azure AD will be a full sync that pulls in all specified user info and provisions iLMS accounts. After the initial sync the connector will only look for changes to Azure user accounts and will make changes in iLMS accordingly as users are modified, added, and inactivated in Azure. Any changes made to user profiles directly in iLMS will not be recognized by the Azure connector unless a change takes place to the user record in Azure.
Azure AD - Preparation
To set up the initial connection between Azure AD and iLMS, some data is needed from the Azure and we need to ensure the correct permissions are in place.
Gather Information
The following 3 values are needed from Azure AD:
- Directory (tenant) ID
- Application (client) ID
- Client Secret Value
To locate these values follow these steps:
- In Azure Active Directory, locate the tenant you would like to use.
- From the tenant, navigate to "App registrations" in the left-hand column.
- We recommend creating a new application and naming it something descriptive such as "iLMS_Azure_Connector".
- Click the application display name to view details for the application.
- From the Application overview screen, 2 of the necessary values are visible.
Both the Directory (tenant) ID and Application (client) ID are listed on this screen.
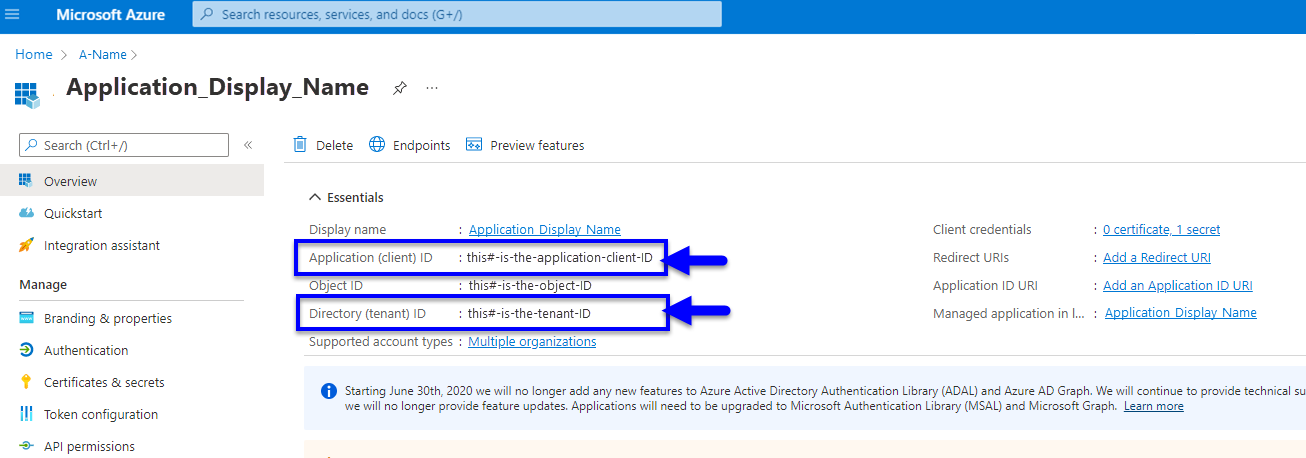
(click to view enlarged image)
- To locate the 3rd value, navigate to "Certificates & Secrets" from the left-hand column within the application.
- Create a new client secret for iLMS to use. Immediately after creation, copy and hold onto the data from the "Value" field.
(Client secret values cannot be viewed, except for immediately after creation. Be sure to save the secret when created before leaving the page.)
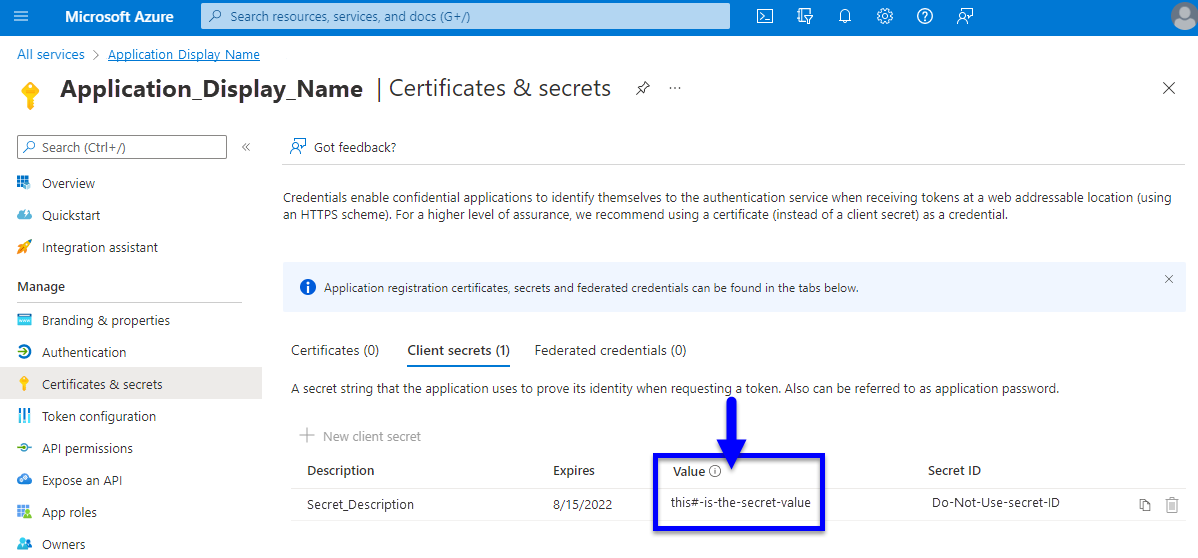
(click to view enlarged image)
Check Application Permissions
Once all 3 of the necessary values have been located in Azure AD it's time to ensure the application will have the necessary permissions to read and sync user profile data from Azure via API.
- From the application, navigate to "API Permissions".
- Ensure the application has "User.Read.All" permissions for Microsoft Graph and that the status column states "Granted" for your tenant.

(click to view enlarged image)
- If these permissions are not present, you may need to add a permission for this application and select "User.Read.All" from the user category.
- After the appropriate permission has been added the "Grant admin consent" button may need to be clicked as well.
Once all the necessary values have been gathered and the permissions are set up correctly, it's time to input details into the iLMS admin console to establish a connection.
iLMS Admin Console - Create a New Directory Connection
Location:
Settings Tab -> Directory Services -> Azure Active Directory Connector
In iLMS navigate to the settings tab and select "Directory Services" from the resulting menu.
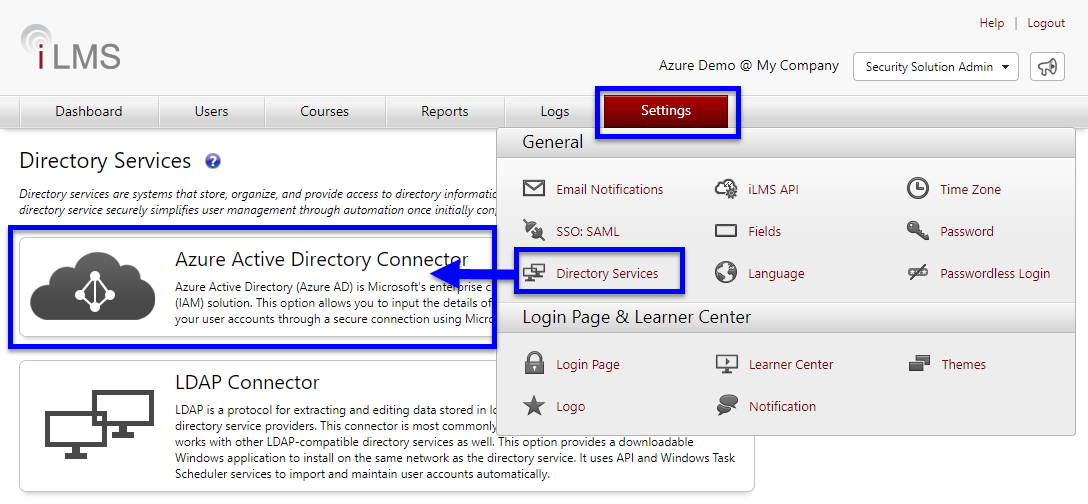
(click to view enlarged image)
Click "Add Directory" to create a new Azure AD connection.
Input Directory Info and Test Connection
Start by filling out only the first four fields under the "Directory Info" section.
The directory name is just a descriptive label for your connection that will be used in iLMS. Populate the other 3 fields with the corresponding values from Azure AD.
Click "Test Connection" to ensure the details are correct and a connection can be established between the two systems. This will result in a success message or an error. Make any necessary adjustments until the connection is successful.

Once the Azure Directory is successfully connected, its time to fill out the other details.
Filter
This section is not required. In the event that the Azure directory contains more users than you would like to register in iLMS, this field can be used to create a filter that only selects users that meet specific criteria. The expected format of the filter is the same as used with Microsoft Graph API.
 Only the portion that typically appears after the "=" in the API request is required for this field.
This example filter shown would return only users with a displayname field that starts with the letter J.
This will help ensure the right set of users is selected before any accounts are provisioned in iLMS.
Graph explorer can be found here:
https://developer.microsoft.com/en-us/graph/graph-explorer
Send a GET request with this URL to fetch and filter users.
https://graph.microsoft.com/v1.0/users?$filter=something eq 'this'
Relevant Microsoft API documentation can be found here:
https://docs.microsoft.com/en-us/graph/query-parameters#filter-parameter
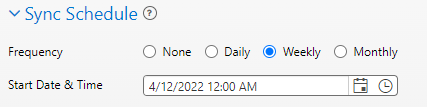
Sync Schedule
This determines the day, time, and frequency that iLMS will sync user data.
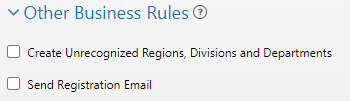
Other Business Rules
Check applicable boxes to determine if unrecognized user hierarchy values (region/division/department) can be created by Azure and whether users should receive a registration email immediately upon creation in iLMS.
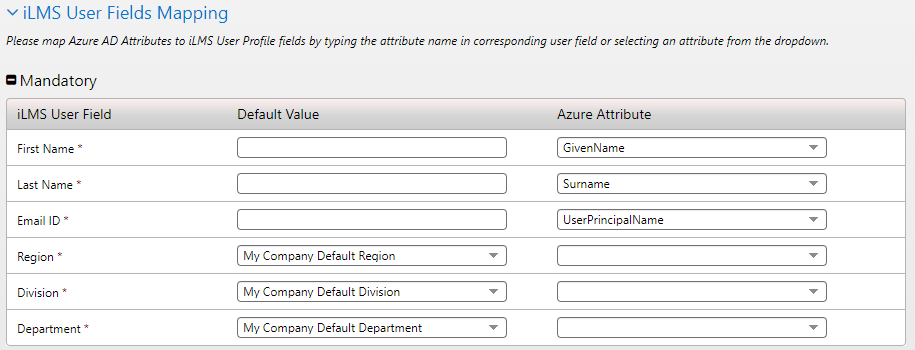
iLMS User Fields Mapping
In this section, you will map the existing fields in iLMS to their corresponding Azure AD fields (attributes).
For the most accuracy, we recommend locating a sample user in Azure to ensure attribute names are entered exactly as they appear. The dropdown offers a selection of the most commonly used attributes, but you can also type in the attribute names as needed.
iLMS field names marked with an asterisk * are required to be populated for every user account.
The left-hand column allows you to specify a default value that will be populated for all iLMS user accounts. This is most commonly used for iLMS fields such as region/division/department if there is no applicable Azure user profile attribute that can be mapped.
If you do populate your own attributes for region/division/department please ensure that the checkbox for "Create Unrecognized Regions, Divisions, and Departments is checked in the "Other Business Rules" section of connection settings.
At a minimum, It is recommended to map First Name, Last Name, and Email Address or Employee ID. Any other fields marked as mandatory for the organization in iLMS will also be required.
This section displays all visible user profile fields for your organization. To add additional fields to map they must be enabled for your organization. More info about fields here: iLMS Fields and Unique Identifier
Once all the desired settings are in place and the fields are mapped, click "Save" at the bottom of the page to start the first sync.
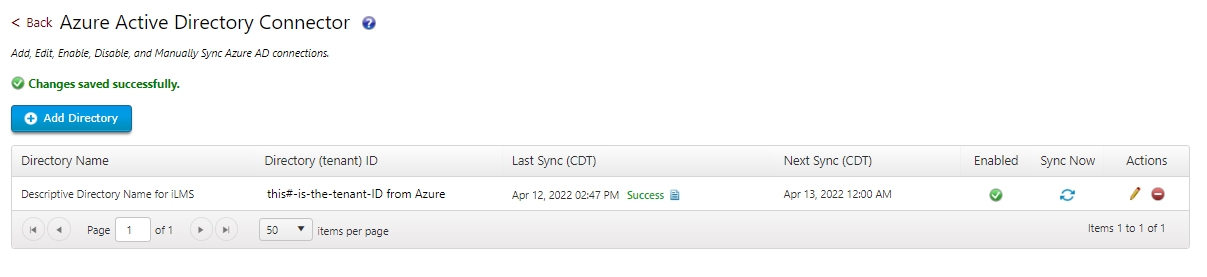
Directory List, Sync Info, and other Connection Settings
After the initial setup, the status of all of your directory connections can be viewed under Azure Active Directory Services.
Location:
Settings Tab -> Directory Services -> Azure Active Directory Connector
(click to view enlarged image)
- Directory Name
This displays the name of the directory provided in the settings - Directory (tenant) ID
The Azure tenant ID associated with the connection - Last Sync
The date/time the last sync occurred for the connection. This section also provides the current status of the sync, whether it is in progress, successful, or failed.
A JSON log file is also available which contains a summary of the most recent sync.
Just click the page icon next to the status to generate a log file to download. - Next Sync
The date/time that the next sync will occur. This date/time is calculated based on the schedule specified in the connection settings. - Enabled
A green check indicates the connection is enabled. If you would like to disable the connection and prevent further syncs click the pencil icon to edit the connection settings and click the "Enable Directory" toggle at the top of the settings page to set as disabled. Repeat this process to re-enable the connection at any time. - Sync Now
To initiate a sync outside of the normal schedule click this icon. A sync will begin immediately. - Actions
Edit and Delete. Clicking the pencil icon allows you to modify the existing connection and the red icon deletes the connection from iLMS permanently.
Additional Filter Information
Supported Filters:
- starts with
- endsWith
- eq (equals)
- ne (not equals)
- and
- or
- any
- not
Filter Examples:
- endsWith(mail, 'domain.com')
- endsWith(mail, 'domain.com ') or mail eq '[email protected]'
- endsWith(mail, 'domain.com') and mail ne '[email protected]'
- startsWith(mail,'firstname')
- startsWith(givenName,'firstname')
- department eq 'human resources'
- givenName eq ‘firstname’
- endsWith(mail,'domain.com') and not startswith(mail,'this')
Filter Compatible Attributes:
| AccountEnabled City CompanyName Country CreatedDateTime Department DisplayName EmployeeHireDate EmployeeId EmployeeType FaxNumber GivenName Id | JobTitle MobilePhone OfficeLocation PostalCode PreferredLanguage State StreetAddress Surname UsageLocation UserPrincipalName UserType ageGroup | assignedLicenses assignedPlans businessPhones consentProvidedForMinor creationType deletedDateTime employeeOrgData externalUserState externalUserStateChangeDateTime identities imAddresses mailNickname onPremisesImmutableId | onPremisesLastSyncDateTime onPremisesProvisioningErrors onPremisesSamAccountName onPremisesSecurityIdentifier onPremisesSyncEnabled onPremisesUserPrincipalName otherMails passwordPolicies passwordProfile provisionedPlans proxyAddresses showInAddressList |
This will help ensure the right set of users is selected before any accounts are provisioned in iLMS.
Graph explorer can be found here:
https://developer.microsoft.com/en-us/graph/graph-explorer
Send a GET request with this URL to fetch and filter users.
https://graph.microsoft.com/v1.0/users?$filter=something eq 'this'
Relevant Microsoft API documentation can be found here:
https://docs.microsoft.com/en-us/graph/query-parameters#filter-parameter
