Bulk Update
Bulk Update allows you to register, update, inactivate, activate, and delete users from the iLMS by uploading a spreadsheet. You can use the blank template provided or download a list of current users, make changes as needed and then upload it back into the system.
Up to 5,000 users can be updated at one time using this process.
Step 1: Beginning Bulk Update
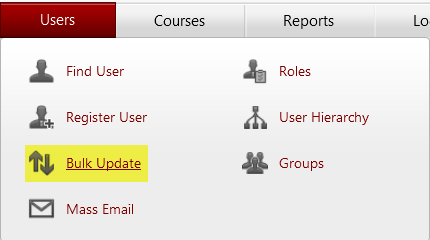
1. From the Users tab, click the Bulk Update link.
2. Download the blank CSV template by clicking Download template file or click Download user list to download a current list of users. You can then edit this list and re-upload it to apply the changes. Browse allows you to view and select the CSV file you would like to use to bulk update employee IDs.

3. The following fields are required when registering new users in the system:
- First name
- Last name
- Employee ID (Only required when users are allowed to login using their Employee ID)
- Email ID
- Region,Division and Department
Note:The file must be saved as a CSV file type or it will not upload to the iLMS.
Note:There is a 5,000 record limit for the Bulk Update feature. For 5000 records, you will need to split the update into multiple templates.
For more information character limits, restrictions, and input types see the article here:
Upload Fields Required (*) Formats
Please follow this link to view information on user profile fields corresponding to the bulk update template region/time/language columns:
Region, Time, and Language Codes
4. If you are hosting training in more than one language, you can set the default language for users by entering the language name in the language field.
5. If you need to update a users e-mail ID, enter it in the New Email ID field
6. To update existing users add one of the following codes to the Action field:
| blank | Field Left Blank: If the users e-mail is already in the system, any fields that don't match will be replaced with data from the spreadsheet. Otherwise, a new user will be created in the iLMS. |
| R | Register: The new user will be added. |
| U | Update: Any changes to any fields in the spreadsheet will be made in the iLMS database. |
| A | Activate: Marks the user active. |
| I | Inactivate: Marks the user inactive. This is an ideal solution for managing employees who leave your organization. Inactive users do not appear in reports by default , but they do retain their transcript information for reporting and can be reactivated at any time. |
| D | Delete: Deletes the user from all iLMS databases. This operation cannot be undone. User transcripts are retained, but cannot be included in reporting. |
7. Click the Browse button, point to the CSV file you created and click Open.
8. Check any check boxes that apply. (See the bulk update help file for more details on the options available.)
9. Click the Upload button.
Step 2: Bulk Update Confirmation
Once you click on upload button, system validates uploaded file and display confirmation screen. Confirmation screen gives you a chance to verify the details and then complete or cancel the bulk update process.This screen shows 3 types of information.
User Records with Errors
Any record with an error in it will be displayed. The bulk update process can continue even if there are records with errors. Those users will not be registered or updated and a spreadsheet of just the bad records will be created so you can download it, correct the errors, and re-upload them.

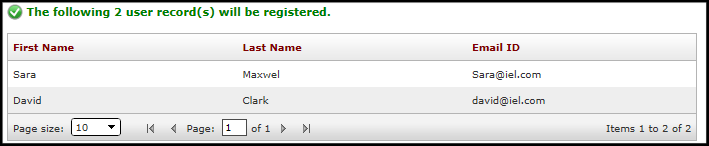
New User Records with No Errors
This is the list of good records that will be bulk registered. All of these records will be saved on the system in the bulk update log.
Existing User Records with No Errors
This is the list of good records that will be updated. All of these records will be saved on the system in the bulk update log.
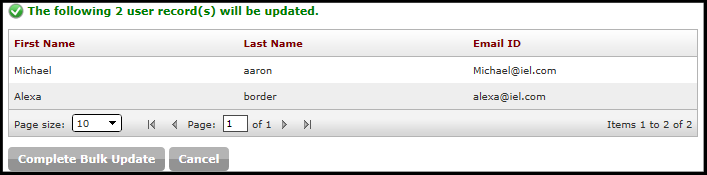
Complete Bulk Update
Executes the bulk update process.
Please do not use the back or forward button or navigate away from the page until the operation is complete.
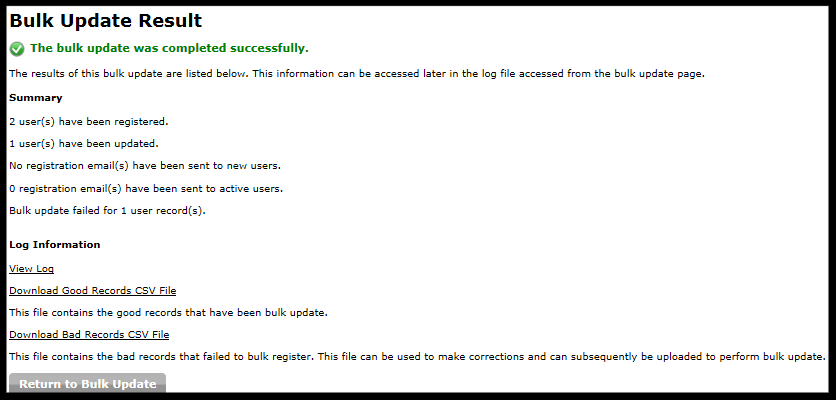
Step 3: Bulk Update Results
This page shows a summary of the results and allows you to download log files, which will be stored in the system and accessible at any time.
If bulk update complete with an error or get failed then you will see the following screen

View Log
Allows you to view a log of all actions taken during the bulk update process.
Download Good Records CSV File
Allows you to view the good records that have been bulk registered or updated.
Download Bad Records CSV File
Allows you to view the bad records that were not able to be bulk registered or updated. It is a good idea to download this file, make corrections, and re-upload it to complete the process.
